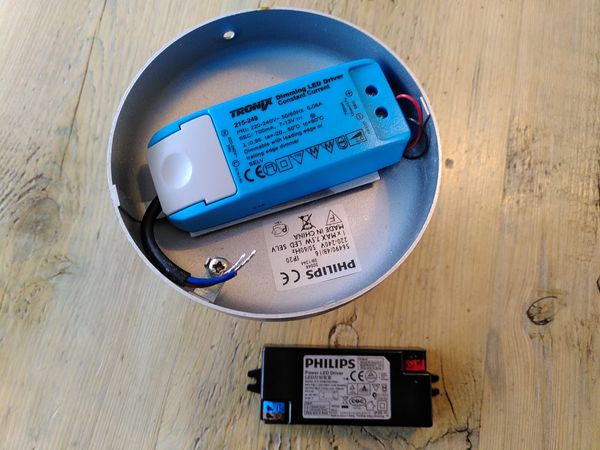
Moving into the cloud

January 17th, 2010 No comments

Last week I setup a server in a cloud based on Xen virtualization technology. After some hours research I decided to go for the Rackspace cloud. I chose the minimal setup to start with, which is a 256MB memory configuration that comes with 10GB disk space. As stated in the specs, the 256MB plan will get you 1/64 of the CPU allocation. Which is fine to start with for a standard LAMP setup.

For now they only offer a large variety of Linux distributions. I chose Debian 5.0 Lenny, because it makes migration easier as the site is running on Debian 5.0 already. The registration process and setup of the minimal Debian install went very smoothly. In under two hours I had successfully migrated a website. So for the setup part I am totally satisfied, let’s see how the availability part will develop.

Categories: Linux Tags: , ,

Jmeter JSF client state

January 15th, 2010 No comments

In order to know what kind of resources a new application needed I figured out to do a load test. The load testing software I used for this test is Apache Jmeter. The application to test is a Java based application deployed in Tomcat 6.

I used the Jmeter HTTP Proxy Recorder to simulate a normal user session to create a realistic test plan. Once I executed the test plan against the web application it returned Internal Server Error (Response code: 500). By using the “View Results Tree” Listener I was able to locate the problem as the Listener displays basic HTML and XML representations of the response.

javax.faces.application.ViewExpiredException: viewId:/presentation/task.jsf - View /presentation/task.jsf could not be restored.

It appeared that the HTTP Proxy Recorder had recorded the server and client state. The javax.faces.ViewState field is written for both server and client side state saving. So removing this attribute from the sampler data makes Jmeter process the pages without error.

It took me a couple of hours to resolve this issue, hope this helps someone stumbling across the same.

Categories: Linux Tags: ,

Search and replace MySQL content

January 6th, 2010 No comments

Today I switched from the Code Markup to the Code Snippet WordPress plugin. Therefore I had to change the way the code block is activated. This is a time consuming job if you have to do this by hand, so I figured out there should be a smarter way of doing this. Check out the MySQL replace function below:

update [table_name] set [field_name] = replace([field_name],’[string_to_find]‘,’[string_to_replace]‘);

And so the above translated to the lines I needed:

mysql> update wp_vleeuwen_posts set post_content = replace(post_content, ‘<pre><code>’, ‘[code lang="text"]‘);
Query OK, 35 rows affected (0.06 sec)
Rows matched: 72  Changed: 35  Warnings: 0

mysql> update wp_vleeuwen_posts set post_content = replace(post_content, ‘</code></pre>’, ‘[/ code]‘);
Query OK, 35 rows affected (0.01 sec)
Rows matched: 72  Changed: 35  Warnings: 0

mysql>

Notice the little typo I had to make in order to let the above code snippet work ([/ code]).

Categories: Linux Tags: ,

Switched to RoundCube

December 30th, 2009 No comments

Since I first started using a webmail client Squirrelmail was my number one. But lately I missed some functions like viewing HTML formatted mail, auto address completion and LDAP address book functionality. So I started to look for a webmail client that comes with this functionality build-in and came up with this nice AJAX based webmail solution for IMAP servers, called RoundCube.

The fact that RC will be in the next Debian stable release (squeeze) was the final straw. Using the Lenny backports repo you can install RC on Lenny (current stable). See the following steps below:

1. Create to following file if it not exists:

# vi /etc/apt/preferences

2. Add the following lines:

Package: *
Pin: release a=stable
Pin-Priority: 600

Package: roundcube roundcube-core roundcube-mysql
Pin: release a=lenny-backports
Pin-Priority: 999

There is also a postgresql and sqlite database meta-package available.

3. Edit /etc/apt/sources.list and add the following lines:

# Testing (squeeze) for gallery2
deb http://ftp.us.debian.org/debian/ squeeze main contrib non-free
deb-src http://ftp.us.debian.org/debian/ squeeze main contrib non-free

4. Update the apt database and upgrade the gallery2 package:

# apt-get update
# apt-get install roundcube

Next thing is to walk through the main.inc.php config file located in ‘/etc/roundcube’ and the Apache configuration.

Restart apache and navigate to your RoundCube url and off you go.

I have been test driving RoundCube for about a month and can conclude that RoundCube is here to stay!

Categories: Linux Tags: ,

Windows wireless driver for Amilo Li 2727

December 11th, 2009 No comments

It took me some time to figure out how to get the wireless device of my Amilo Li 2727 working with Windows 7. For the ones who stumble across the same problem I have describe how to solve it.

  1. Download the Windows XP Drivers For Amilo Li 2727 here
  2. Extract the contents of the compressed file
  3. Open ‘Control Panel’, click on ‘System’ and choose ‘Device Manager’
  4. Open the ‘Action’ menu item and click on ‘Add legacy hardware’
  5. Next -> Next -> Next and pick ‘Network Adapters’
  6. Choose ‘Have disk’ and Navigate into the ‘04 WLAN’ directory
  7. Select ‘Atheros AR5007EG Wireless Network Adapter’
  8. Install the FSC Launchmanager from the ‘05 FSC_LaunchManager’ directory by executing the setup.exe
  9. Reboot

Once you have rebooted you should have a working wireless device. To active the wireless device, you need to press the Fn+F1 button combination and choose WLAN. I can confirm this driver works on Windows 7.

Good luck!

Categories: Blog Tags: ,

vsftpd and SSL

November 28th, 2009 No comments

This howto describes how to configure vsftpd to enable SSL using so called intermediate/ chaining certificates.

Edit vsftpd.conf so that SSL is enabled:

ssl_enable=YES
rsa_cert_file=/usr/share/ssl/certs/vsftpd.pem
force_local_data_ssl=NO
force_local_logins_ssl=NO

It is very important to construct the certificate file /usr/share/ssl/certs/vsftpd.pem with the correct certificate order. The fist Your certificate file has to be a .pem file. If you also received an Intermediate Certificate then you have to concatenate this with the Domain Certificate and your Private Key file into one single .pem file. Make sure all the information is included, without any spaces or blanks, see below.

—–BEGIN CERTIFICATE—–
 (your_domain_name.crt)
—–END CERTIFICATE KEY—–
—–BEGIN CERTIFICATE—–
 (chaining certificate 3)
—–END CERTIFICATE KEY—–
—–BEGIN CERTIFICATE—–
 (chaining certificate 2)
—–END CERTIFICATE KEY—–
—–BEGIN CERTIFICATE—–
 (chaining certificate 1)
—–END CERTIFICATE KEY—–
—–BEGIN RSA PRIVATE KEY—–
 (your_domain_name.key)
 —–END RSA PRIVATE KEY—–

This is how to check a SSL enabled FTP service (FTP Secure). See the result below:

$ lftp -u username localhost -e "debug;set ftp:ssl-protect-data true;ls;exit"
Password:
—- Connecting to ftp.student.vu.nl (130.37.129.243) port 21
<— 220 Welcome to the Storage FTP service.
—> FEAT
<— 211-Features:
<—  AUTH SSL
<—  AUTH TLS
<—  EPRT
<—  EPSV
<—  MDTM
<—  PASV
<—  PBSZ
<—  PROT
<—  REST STREAM
<—  SIZE
<—  TVFS
<—  UTF8
<— 211 End
—> AUTH TLS
<— 234 Proceed with negotiation.
—> OPTS UTF8 ON
Certificate: C=NL,O=Vereniging VU-Windesheim,OU=UC-IT,CN=ftp.student.vu.nl
 Issued by:        C=NL,O=TERENA,CN=TERENA SSL CA
 Checking against: C=NL,O=TERENA,CN=TERENA SSL CA
  Trusted
Certificate: C=NL,O=TERENA,CN=TERENA SSL CA
 Issued by:        C=US,ST=UT,L=Salt Lake City,O=The USERTRUST Network,OU=http://www.usertrust.com,CN=UTN-USERFirst-Hardware
 Checking against: C=US,ST=UT,L=Salt Lake City,O=The USERTRUST Network,OU=http://www.usertrust.com,CN=UTN-USERFirst-Hardware
  Trusted
Certificate: C=US,ST=UT,L=Salt Lake City,O=The USERTRUST Network,OU=http://www.usertrust.com,CN=UTN-USERFirst-Hardware
 Issued by:        C=SE,O=AddTrust AB,OU=AddTrust External TTP Network,CN=AddTrust External CA Root
 Checking against: C=SE,O=AddTrust AB,OU=AddTrust External TTP Network,CN=AddTrust External CA Root
  Trusted
Certificate: C=SE,O=AddTrust AB,OU=AddTrust External TTP Network,CN=AddTrust External CA Root
 Issued by: C=SE,O=AddTrust AB,OU=AddTrust External TTP Network,CN=AddTrust External CA Root
  Trusted
<— 200 Always in UTF8 mode.
—> USER xxx330
<— 331 Please specify the password.
—> PASS XXXX
<— 230 Login successful.      
—> PWD
<— 257 "/"
—> PBSZ 0
<— 200 PBSZ set to 0.
—> PROT P
<— 200 PROT now Private.
—> PROT P
<— 200 PROT now Private.
—> PASV
<— 227 Entering Passive Mode (130,37,129,243,196,139).
—- Connecting data socket to (130.37.129.243) port 50315
—- Data connection established
—> LIST
<— 150 Here comes the directory listing.
Certificate: C=NL,O=Vereniging VU-Windesheim,OU=UC-IT,CN=ftp.student.vu.nl
 Issued by:        C=NL,O=TERENA,CN=TERENA SSL CA
 Checking against: C=NL,O=TERENA,CN=TERENA SSL CA
  Trusted
Certificate: C=NL,O=TERENA,CN=TERENA SSL CA
 Issued by:        C=US,ST=UT,L=Salt Lake City,O=The USERTRUST Network,OU=http://www.usertrust.com,CN=UTN-USERFirst-Hardware
 Checking against: C=US,ST=UT,L=Salt Lake City,O=The USERTRUST Network,OU=http://www.usertrust.com,CN=UTN-USERFirst-Hardware
  Trusted
Certificate: C=US,ST=UT,L=Salt Lake City,O=The USERTRUST Network,OU=http://www.usertrust.com,CN=UTN-USERFirst-Hardware
 Issued by:        C=SE,O=AddTrust AB,OU=AddTrust External TTP Network,CN=AddTrust External CA Root
 Checking against: C=SE,O=AddTrust AB,OU=AddTrust External TTP Network,CN=AddTrust External CA Root
  Trusted
Certificate: C=SE,O=AddTrust AB,OU=AddTrust External TTP Network,CN=AddTrust External CA Root
 Issued by: C=SE,O=AddTrust AB,OU=AddTrust External TTP Network,CN=AddTrust External CA Root
  Trusted
—- Got EOF on data connection
—- Closing data socket
drwxrwsr-x    3 72745    513          4096 Oct 23 14:28 public_html
<— 226 Directory send OK.
—> QUIT
—- Closing control socket
$
Categories: Blog Tags: , ,

License to rdesktop

November 3rd, 2009 1 comment

Today I recieved a strange message when I tried to open a RDP connection.

$ rdesktop windows.server.local
Autoselected keyboard map en-us
disconnect: No valid license available.

To resolve this issue you need to add the client hostname.

$ rdesktop -n hostname windows.server.local
Autoselected keyboard map en-us
WARNING: Remote desktop does not support colour depth 24; falling back to 16

This happens with rdeskop version 1.6.0 on Fedora 11 (rdesktop-1.6.0-4.fc11.x86_64).

Categories: Linux Tags: ,

A green home server

October 26th, 2009 No comments

This website was served by an old timer PC running on an Intel N440BX Server Board codename Nightshade. Despite being a rock solid system, it housed a dual Intel Pentium III 600Mhz processor configuration which did not meet today’s performance demands and energy consumption.
So I decided to build a new computer system that was a little bit faster and more energy efficient than it’s predecessor and thus environmentally friendly.

After doing some research I decided to go for the following setup:

  • Antec NSK3480 MicroTower, EarthWatts 380 Watt PSU
  • Intel Desktop board D945GCLF2, Atom 330
  • Kingston ValueRam 2GB DDR2 533MHz C4
  • 2 Western Digital AV-GP Green 1TB, 5400~7200rpm, 8MB, SATA2
  • 2 Serial ATA II Cable, 0.75m
  • Scythe Mini Kaze Ultra 40mm x 20mm

The Antec casing comes with an energy efficient PSU. It’s 80 PLUS® certified and is equipped with a built-in active PFC to make the PSU reduce electrical waste and protect the environment.

As some reviews at silentpcreview.com stated, the stock cooler on the chipset is not that quite as you would expect. I decided to replace the 40mm x 10mm stock cooler with the Scythe Mini Kaze Ultra 40mm x 20mm. Because the motherboard sits inside a MicroTower there was space enough to put the Mini Kaze Ultra on top of the heatsink as you can see on the pictures below.

As expected there’s nearly no noise coming from the system. The case itself is designed to do noise cancellation with it’s dual chamber structure, and the new cooler only whispers silently. Besides doing a nice quite job it also makes a difference at it’s cooling task. That’s because it’s 10mm higher then the stock cooler.

Temperatures with the stock cooler:

  1. Chip Temp: +33.0°C
  2. CPU Temp: +43.0°C
  3. Sys Temp: +38.0°C

Temperatures with the Scythe Mini Kaze Ultra cooler:

  1. Chip Temp: +31.0°C
  2. CPU Temp: +41.0°C
  3. Sys Temp: +36.0°C

I’ve planned to do an energy consumption test in the coming days.

Categories: Blog Tags: ,